Language Management
The platform is bilingual: all content is available in English and French to serve agents worldwide. This means that most content you create needs to be entered in both languages.
This page explains how the language system works and how to manage translations in your daily workflow.
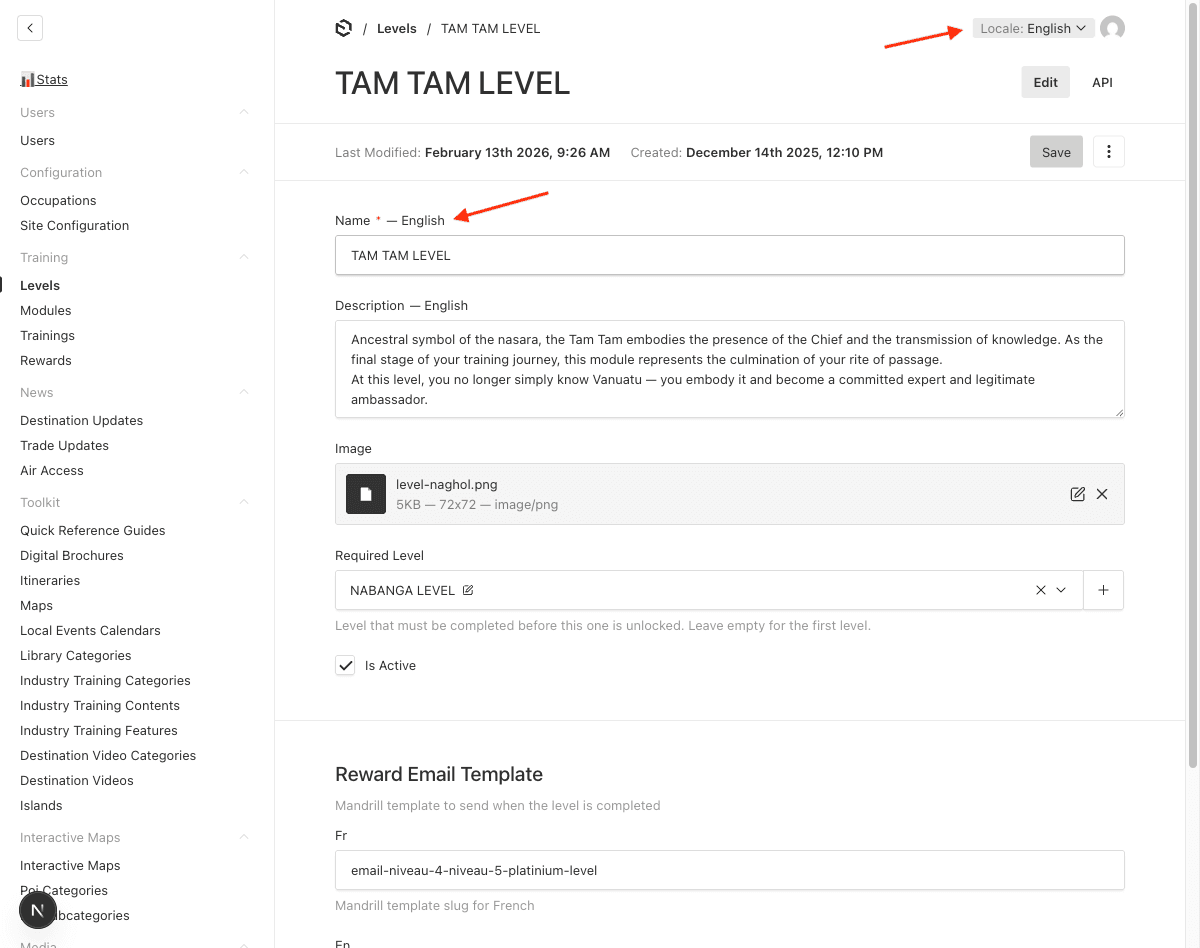
The locale selector changes the content language of the fields you edit. It does not change the admin interface language (the admin panel is always in English).
How to Translate Content
The locale dropdown is in the top-right corner of every edit page. It shows the current language (e.g., “Locale: English”).
- Open any document for editing
- Fill in all fields in English and click Save
- Switch the locale to French using the dropdown
- Fill in the French version of each field and click Save
You must save separately for each locale. Switching locale without saving will discard unsaved changes for the current locale.
What Gets Localized?
Not all fields are localized — only content visible to agents on the frontend. Below is a summary of localized fields by section.
Training
| Section | Localized Fields |
|---|---|
| Levels | Name, Description |
| Trainings | Name, Description |
| Modules | Name, Description, and all slide content (video URLs, rich text, quiz questions & answers) |
| Rewards | Name, Description, Content |
News
| Section | Localized Fields |
|---|---|
| Destination Updates | Title, Content |
| Trade Updates | Title, Content |
Toolkit
| Section | Localized Fields |
|---|---|
| Quick Reference Guides | Title, Description, File, Cover |
| Digital Brochures / Itineraries | Title, File, Cover |
| Destination Videos | Title, Description |
| Industry Training Content | Title |
| Industry Training Features | Name |
Other Content
| Section | Localized Fields |
|---|---|
| Contact Groups | Name, contact names/descriptions/labels |
| Interactive Maps | POI descriptions |
| Self-Famils Programs | Title, Content |
| VTO Famil Opportunities | Content |
| Local Events Calendar | Content, Media |
Configuration
| Section | Localized Fields |
|---|---|
| Regions | Name |
| Occupations | Label |
| Islands | Name |
| POI Categories / Subcategories | Name/Label |
Localized Uploads
Some sections have localized upload fields (marked as “File” or “Cover” above). This means you can upload a different file for each language — for example, a French PDF and an English PDF for the same Quick Reference Guide.
When you switch locale, the upload field may appear empty even if a file was uploaded for the other language. This is expected — simply upload the correct file for the current locale.
Best Practices
- Always fill both languages — Missing translations will show as empty content on the frontend for agents in that language
- Save before switching — Always save your work before changing the locale selector
- Start with English — English is the default locale; fill it in first, then switch to French
- Check both versions — After editing, switch back and forth between locales to verify both versions are complete
- Modules are the most complex — Each slide within a module has localized content (text, video URL, quiz questions and answers). Take extra care to translate all slides